Is Your 12-Volt Refrigerator Draining Your Batteries?
- Just CAMP Wait
- Mar 9
- 7 min read
Updated: Mar 26

Recently, many travel trailer manufacturers have adopted 12-volt only refrigerators to meet the demand for energy-efficient appliances and the increased use of RV mounted solar systems. These refrigerators are lightweight, compact, and quiet, but they can lead to frequent dead batteries, frustrating new owners. Since 12-volt refrigerators draw up to 10 amps during the initial cool down cycle, they can quickly deplete battery reserves, especially without an external power source. Further complicating the issue is the fact that many manufacturers are beginning to forego battery cut-off switches except in their higher-end models which can lead to batteries rapidly draining in storage. We'll cover a few tips, tricks, and upgrades that can help prevent your batteries from being another victim of the 12-volt only refrigerator.
Turn Off The Refrigerator When In Storage
I know what you're thinking..."Why didn't I think of that" (with a sarcastic eyeroll). The truth is that most of the time people overlook this step because they just can't find where to turn it off and the dealer never showed them where to look during the walk thru. This is a shockingly common problem for new RVers if the manufacturer didn't install a battery cutoff switch. Even after the initial cool down cycle the refrigerator can be drawing 5 amps just to maintain a temperature leading to a standard lead-acid battery being drained in 12-hours.
So where do we look for the refrigerator shutoff? In my experience, most 12-volt refrigerators locate the shutoff on the temperature control knob inside of the refrigerator door. Simply use the push-button control or knob control depending on your model to turn the appliance off.

Plug In The RV During The Initial Cool Down Cycle
The initial cool down cycle is when you are starting the refrigerator in preparation for a trip and cooling from the ambient temperature to a proper refrigeration temperature. During this time the appliance will be running for hours on end without cycling on and off. That's 10 amps being sucked from the batteries every hour which quickly depletes them. I recommend starting your refrigerator's cool down the day before you travel to ensure it isn't constantly draining the batteries while you're on the road. You'll see about half the battery draw (4 to 5 amps) once the refrigerator is only cycling to maintain the set temperature.
You can use a 15-amp / 110-volt adapter with an extension cord to accomplish this if you don't have a 30/50 amp RV receptacle installed at your house or storage location. Simply use the adapter to plug your trailer into a home outlet, turn on the main breaker and convertor breaker on your RV breaker box (these should be clearly marked otherwise refer to your RV's manual), and then turn on the refrigerator.
Upgrade Your Batteries
This is one of the primary solutions to the battery draw issues with 12-volt only refrigerators, but definitely not the cheapest solution. Chances are your RV probably came with a single, basic 12-volt, lead-acid, deep-cycle battery. Most of these only offer around 80 amp-hours of capacity and because they are lead-acid they can only be discharged to about 50-60% of capacity without damaging the battery. That means you likely only have about 48 available amp-hours. During a cool-down cycle with the refrigerator running at 10-amps, you have only about 4 to 5 hours of battery life available. That also assumes that you have no other power draws on your battery such as lights, slide-use, etc. Needless to say, that doesn't give you much time. There are a couple ways to go about beefing-up your battery capacity that we'll look at.
Lead Acid or AGM Batteries
First, you can expand your battery bank with additional lead-acid or AGM batteries. Nearly all standard RV converters will handle lead-acid and AGM batteries just fine. Just make sure that all batteries you are installing are of the same type. Don't mix new and old batteries or AGM and lead-acid batteries. Also, these batteries cannot be kept in living areas or other non-vented areas because they vent harmful fumes during use. Of the two options for these batteries, AGM batteries typically hold up the best.
To do this, first figure out how much battery capacity you need. If you want to be able to start your 12-volt refrigerator the day prior to leaving without plugging it in and assume 10 amps consumption during cool down, you will need 24 hrs x 10 amps = 240 amp hours available. Since you can only draw down these batteries to 50% that means you actually need 480 amp hours or 5-6 batteries. That also doesn't include travel time. Now, if you plug your RV in the day before and only need to have power during travel then you will greatly reduce your battery consumption. Your tow vehicle will provide power to the system while in tow to slow down consumption and you'll only be needing 4-5 amps to maintain the temperature of the refrigerator. So then we would need 8hrs x (5 amps - 2 amps vehicle charging) = 24 available amp hours. At 50% capacity that's 48 amp hours. You could get by with a single battery in this case assuming no other 12-volt loads and no shore power only when driving. Most people who aren't boondocking will be somewhere in between these scenarios for normal use once all battery loads are considered meaning you'll probably want at least two batteries.

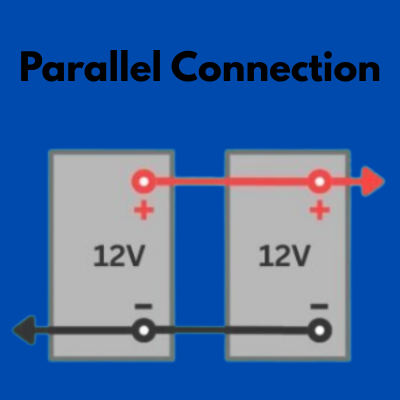
To add a second battery you'll need to ensure you have vented space for it. You'll likely need to purchase a second battery box or a dual battery box and additional cables to connect the batteries. The most commonly used battery cables for an RV are 8 AWG, 6 AWG, or 4 AWG but if you aren't sure which to use be sure to reference a cable sizing chart for your amperage use and length of the wire run. Add the additional 12-volt batteries by wiring them in parallel. Be sure to adjust your solar charger profile to the correct batter type (AGM, Lead-Acid, Lithium) if you have solar charging on board.
The downside to using lead-acid and AGM batteries is size. These batteries can add 60-70 lbs per battery that you add to the system. This can quickly reduce your cargo capacity, increase tongue weight, and limit space. Additionally, these batteries vent hazardous fumes and need to be kept in a vented area outside of the living space. Battery life can also be short compared to other options with a typical life span of only 2 - 5 years.
Lithium Batteries
Lithium batteries have come down drastically in price over recent years. These batteries are lightweight and are more compact than their lead-acid and AGM equivalents. This means you can get a lot more power in the same space when compared to other battery types. They also allow you to discharge them safely down to 90-100% of capacity meaning you get the full rated use out of them. Finally, they don't vent fumes when in use making them safer for non-vented storage spaces. Just be sure not to mix and match battery types, different aged batteries, or different amp hour batteries. Life expectancy is generally 10+ years on a lithium battery.
The calculations for sizing your batteries are the same as before except you don't need to reduce for available capacity. Simply multiply your amp draw x the number of amp hours you want available power to equal your needed capacity. Use the same wire AGW charts referenced before and be sure to wire the 12-volt batteries in parallel.

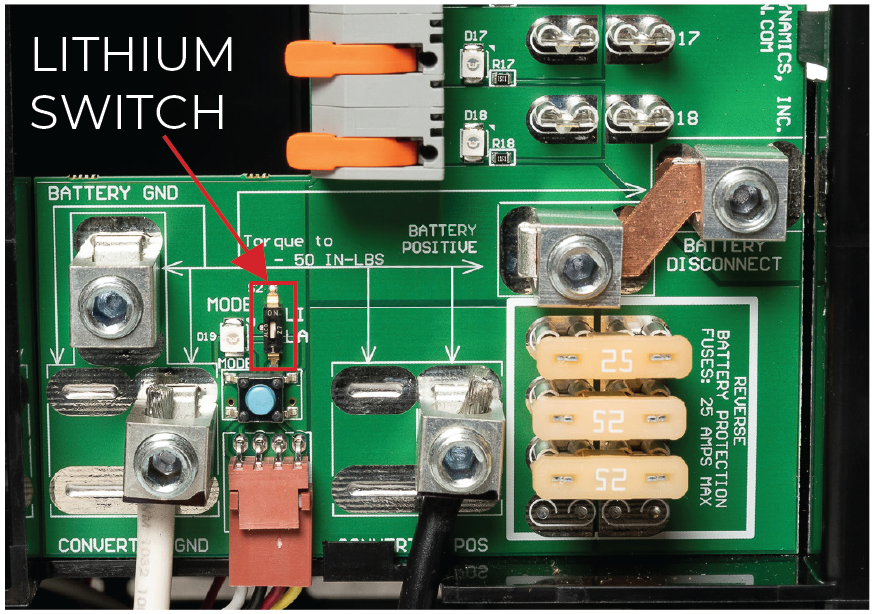
One additional consideration for lithium batteries is the converter in your RV. While most new RVs are coming with lithium compatible converters, many older models did not. Check for a "lithium ready" sticker on your breaker box or check your RV manuals to be sure. Now, just because your converter is lithium compatible doesn't mean its setup for currently for lithium. Many of them have a switch that needs turned on to work properly with lithium batteries. Check the manual for your model converter to see what steps are required. If you do not have a lithium converter, you'll need to replace yours with one that is compatible. I'm not going to delve into how to do that here, but it honestly isn't a difficult process on most models. If you're not comfortable doing it yourself, most RV repair shops can handle it easily.
The final consideration for lithium batteries is cold weather. Lithium batteries cannot be charged below freezing without reducing their lifespan, but they will continue to discharge below freezing. That leaves you with a few options to consider. You can install them in a heated space, but that takes additional wiring and cost. You can get heated batteries as an option with most brands which works well for those camping in extreme cold. Finally, and what I recommend for the average RVer not camping in extreme cold, is to get batteries with cold temperature cutoff. This simply prevents charging below freezing and is built into the battery's internal BMS.
Upgrade Your Solar Charging
Upgrading your solar charging capacity helps alleviate the drain on the batteries. I do caution that this is not a replacement for battery capacity improvements. The reason why is that you're only going to be charging when the solar panels are exposed to the sun and only going to reach anywhere close to max panel rating for a few hours a day. You're likely to see between 20-30 amp hours of charging per day for every 100 watts of solar available and that is over the whole day. Now, if you're wanting to boondock without a generator this may be a necessity. You will need to estimate how many watts of solar you need to refill your batteries each day from the typical draws you place on the battery along with the appliance draw. Then ensure your battery capacity is sufficient to run through the night or cloudy days. Solar installs are far too in-depth to go into here since you'll need to upgrade panels, wiring, and your solar charge controllers. I did want to point out that with the use of 12-volt refrigerators you'll likely need to upgrade more than just batteries if you intend on boondocking due to the increased draw.
Recommended Products From This Article
Weize LiFePO4 Batteries
Weize AGM Batteries
Camco 15 amp Adapter
Spartan Power Battery Cables
Renogy Solar Products
Just CAMP Wait is supported by its audience. When you purchase through links on our site, we may earn an affiliate commission at no extra cost to you. We provide editorial content independently and your support keeps this site up and running.


